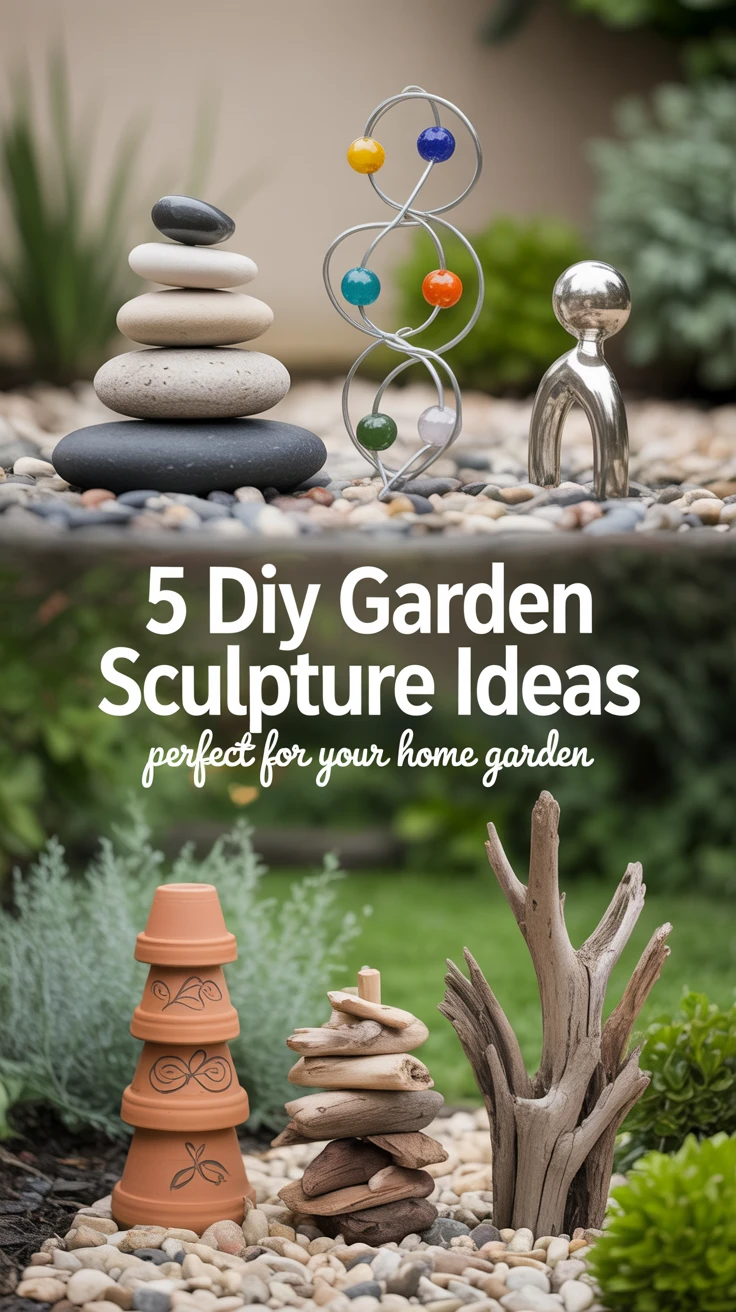

Unleash Your Creativity with DIY Garden Sculptures
There’s something magical about adding personal touches to your garden. When I first started gardening, my spaces felt incomplete until I discovered the joy of creating my own DIY garden sculptures. These artistic elements not only serve as focal points but also express your personality in ways that store-bought decorations simply can’t match.
As someone who’s experimented with numerous garden art projects over the years (including some spectacular failures!), I’ve compiled five beginner-friendly sculpture ideas that require minimal tools and expertise. These projects use readily available materials—some you might already have lying around your home.
Each of these DIY garden sculpture ideas can be completed in a weekend, making them perfect for those new to crafting or anyone looking to add a personal touch to their outdoor sanctuary without breaking the bank.
1. Create Stone Stack Sculptures for a Zen Look
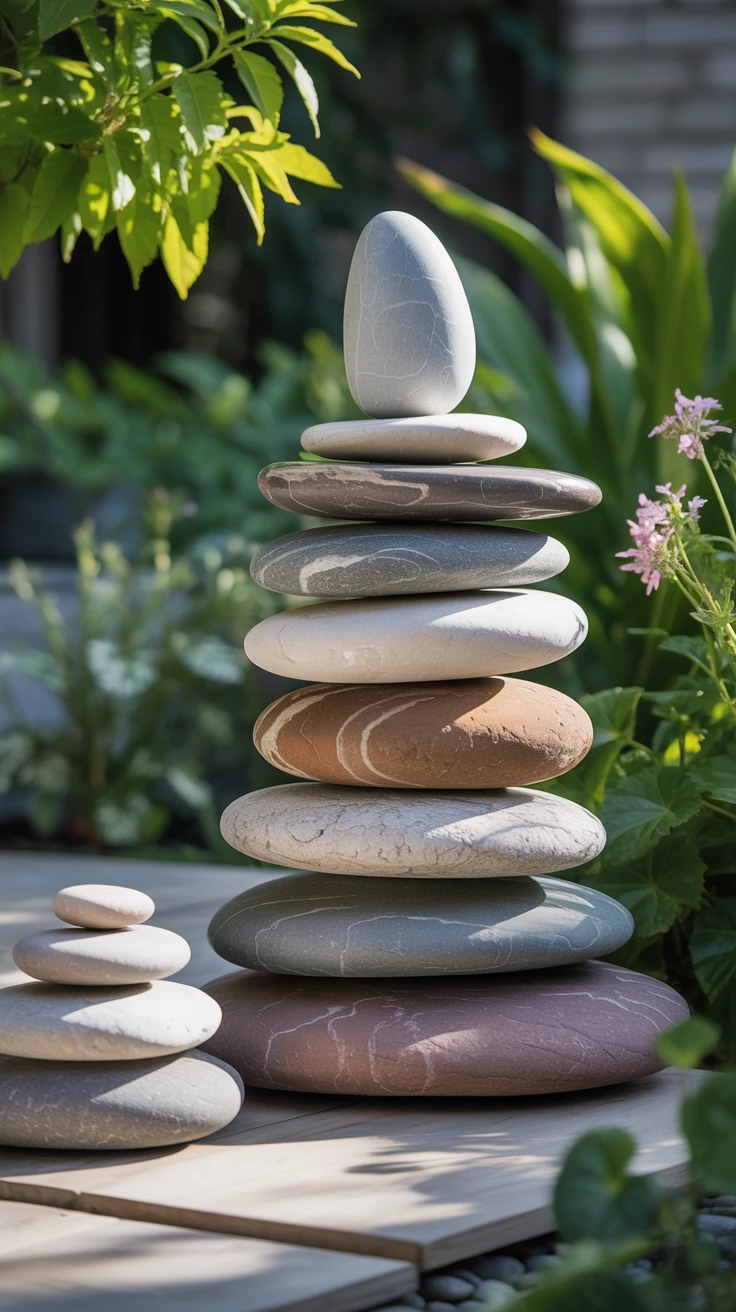
Stone stacking, also known as rock balancing, is perhaps the most accessible form of garden sculpture. I remember my first attempt—a precarious tower that collapsed with the slightest breeze! But with practice, I’ve learned to create surprisingly stable structures that bring a sense of mindfulness to my garden.
What makes stone stacking special is its impermanence. There’s something poetic about creating art that might not last forever, yet can be rebuilt and reimagined countless times.
How to Create Your Stone Stack:
- Gather stones of various sizes, shapes, and colors. Local beaches, riverbanks, or landscaping suppliers are excellent sources.
- Choose a visible location in your garden where the sculpture will serve as a focal point.
- Start with the largest, flattest stone as your base.
- Find the “balance point” for each subsequent stone by slowly rotating it and feeling for the moment when it settles.
- Work patiently, adding one stone at a time, feeling for those magical points where gravity seems to surrender.
Pro Tip: After a rain shower, look for naturally flat, water-worn stones—they typically have more surface area for balancing. I once spent hours trying to balance rounded river rocks before realizing flatter stones would have made my life much easier!
2. Craft Intricate Wire and Bead Garden Ornaments
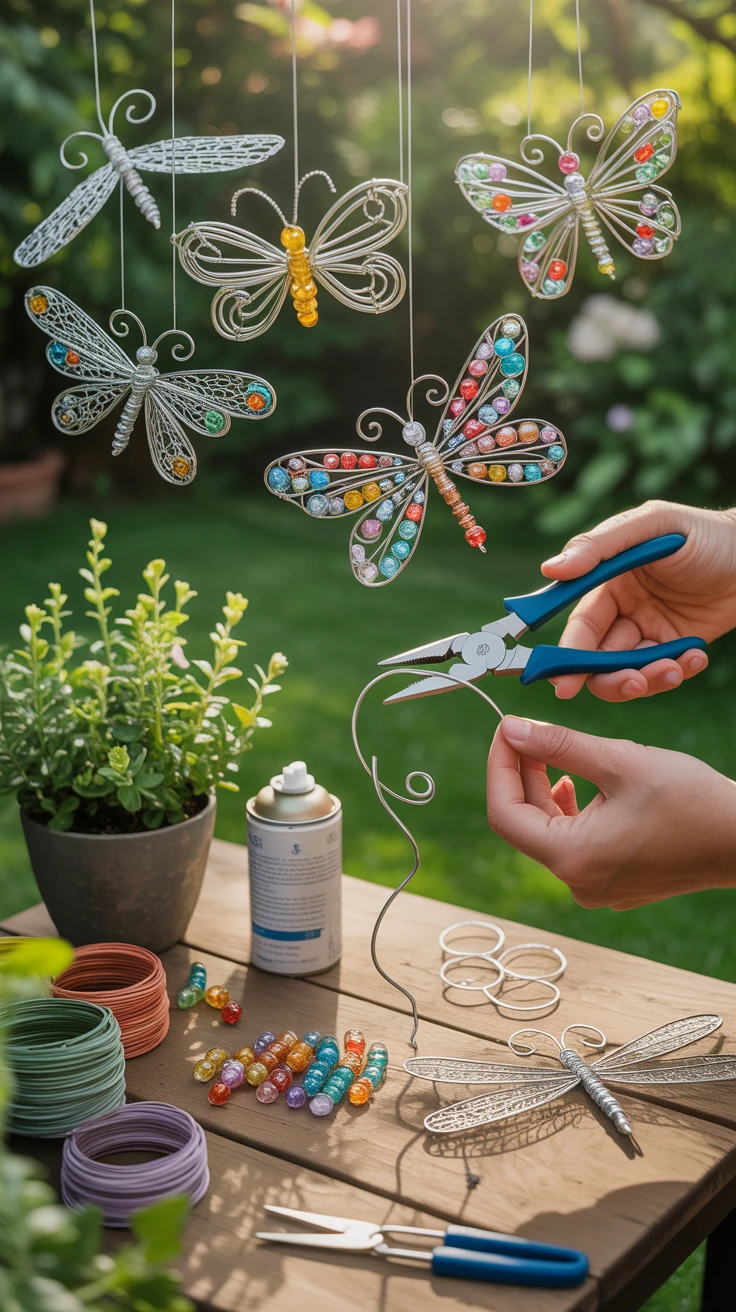
Wire sculptures add an ethereal, delicate element to garden spaces. The first wire butterfly I created looked more like a misshapen moth, but I’ve since refined my technique! These lightweight creations catch sunlight and create beautiful shadows while adding movement to your garden.
Materials You’ll Need:
- Aluminum or galvanized wire (14-16 gauge for structure, 20-22 gauge for details)
- Wire cutters and needle-nose pliers
- Weather-resistant beads (glass, ceramic, or plastic)
- Optional: spray paint designed for outdoor use
Creation Steps:
- Sketch your design first—butterflies, dragonflies, birds, or abstract shapes work wonderfully.
- Form the basic outline with heavier gauge wire.
- Add detail elements with thinner wire, incorporating beads as you go.
- Create a stake or hanging loop to position your sculpture in the garden.
- Seal with clear outdoor varnish if desired for additional weather protection.
Pro Tip: When working with wire, wrap the ends with tape to prevent scratches. I learned this the hard way after ending up with multiple tiny cuts on my hands during my first project!
3. Transform Scrap Metal into Art
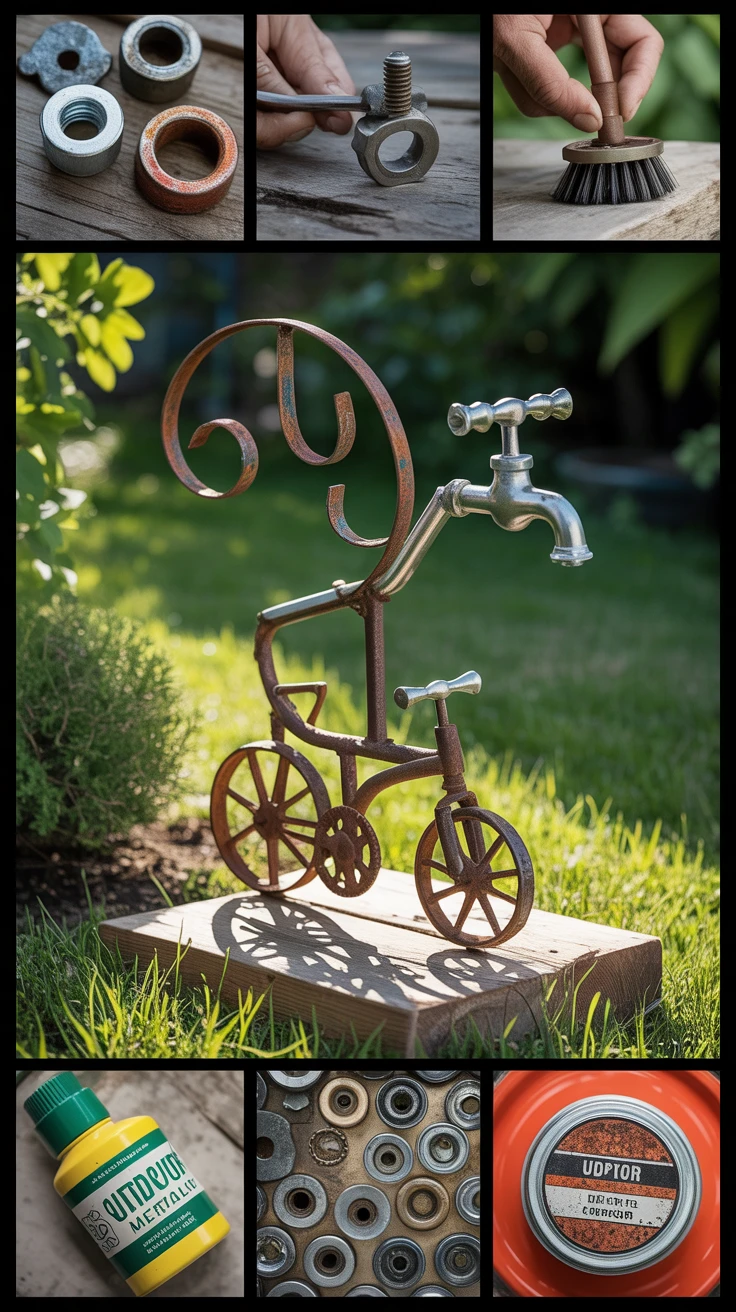
One person’s junk truly is another’s treasure when it comes to DIY garden sculptures. Some of my most-complimented garden pieces began as discarded items headed for the landfill. Old tools, kitchen utensils, bike parts, and hardware can all find new life as whimsical garden art.
My first attempt at metal sculpture involved welding, which was unnecessarily complicated. I’ve since discovered that simple assemblage techniques using nuts and bolts, wire, or even strong adhesives can create stunning pieces without specialized equipment.
Getting Started with Metal Upcycling:
- Collect interesting metal pieces from thrift stores, garage sales, or your own junk drawer.
- Clean all components thoroughly with a wire brush and soapy water.
- Arrange pieces in different configurations until you find a design you like.
- Connect components using bolts, wire, or outdoor-rated adhesive.
- Apply a rust converter followed by outdoor metal paint for longevity.
Pro Tip: Visit local scrapyards on “public days” when they allow individuals to purchase small quantities. I once found a box of vintage faucet handles for $5 that became the “flowers” in a metal garden sculpture that still delights visitors years later.
4. Build Whimsical Clay Pot Totem Poles

Clay pot totems were my gateway into garden sculpture ideas. After a disastrous attempt at pottery (let’s just say my clay bowl looked more like a deflated tire), I discovered I could create impressive structures simply by stacking and gluing terracotta pots and saucers.
These totems can be as simple or elaborate as you wish, and they provide vertical interest in garden beds. I’ve created everything from bird baths to fairy towers using this technique.
Creating Your Clay Pot Totem:
- Gather various sizes of terracotta pots, saucers, and other clay elements.
- Clean all pieces and allow them to dry completely.
- Plan your design, alternating pots (both upright and inverted) with saucers.
- Apply waterproof construction adhesive between each piece.
- Allow 24 hours of drying time before moving your creation.
- Paint or decorate with outdoor acrylics if desired.
- Seal with clear waterproof sealer to protect any painted surfaces.
Pro Tip: Insert a metal rod through the drainage holes for added stability in windy locations. My first totem toppled during a storm, creating a terracotta graveyard that took hours to clean up!
5. Design Driftwood Art for a Natural Touch
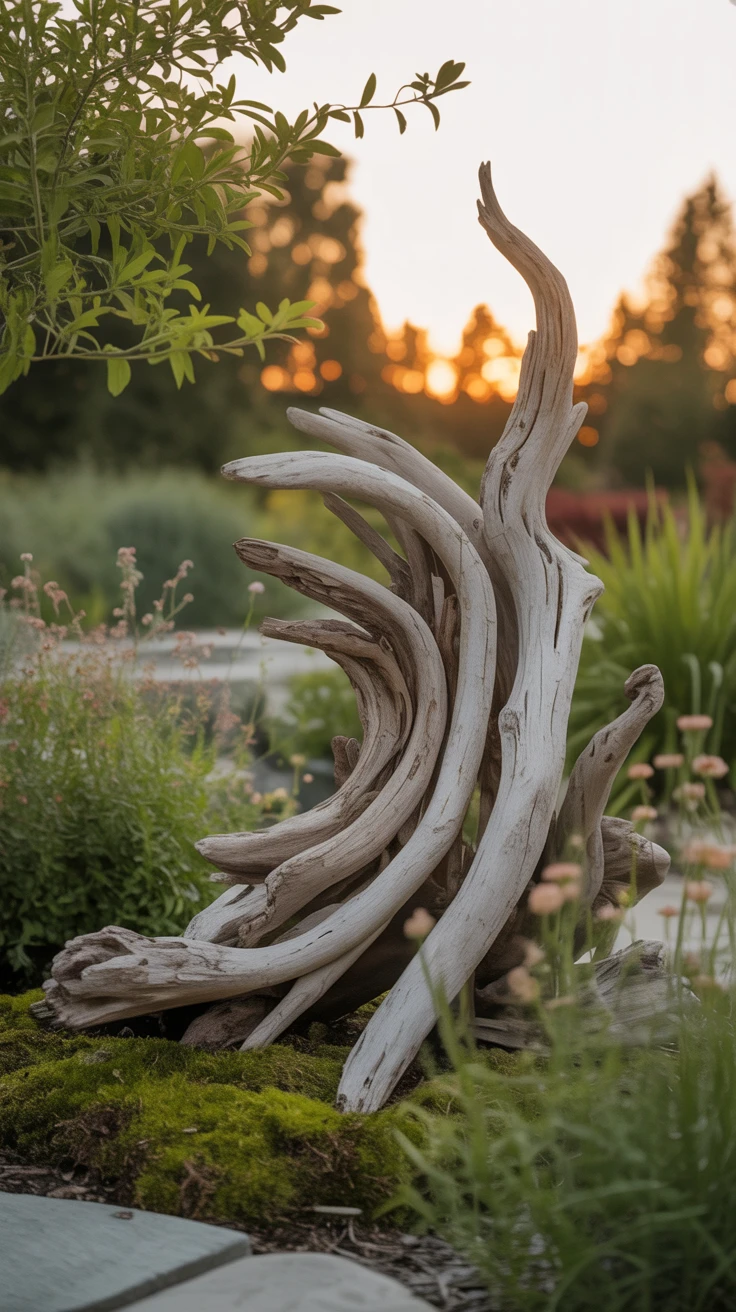
Driftwood sculptures bring organic shapes and weathered textures to garden spaces. There’s something deeply satisfying about transforming pieces shaped by nature into artistic displays. My coastal-inspired garden features several driftwood creations that remind me of favorite beach vacations.
If you don’t live near water, don’t worry—many landscaping suppliers sell driftwood, or you can weather regular wood yourself with a simple bleaching solution.
Driftwood Sculpture Basics:
- Collect interesting driftwood pieces with character and appealing shapes.
- Allow wood to dry completely if freshly collected.
- Remove any loose bark or debris with a stiff brush.
- Arrange pieces in different configurations until you find a pleasing design.
- Connect pieces using weather-resistant screws, marine-grade adhesive, or by notching and fitting.
- Apply a clear outdoor sealer to preserve the wood’s appearance.
Pro Tip: If creating a larger sculpture, secure it to the ground using rebar or garden stakes. I once watched in horror as a wind gust sent my prized driftwood bird sculpture tumbling through my neighbor’s prized dahlias!
Bringing Art to Your Garden Space
Creating DIY garden sculptures connects us to our outdoor spaces in deeply personal ways. Each piece tells a story—of materials reclaimed, of moments spent crafting, of your unique vision for your garden sanctuary.
I’ve found that these projects often become conversation starters when friends visit, and there’s nothing quite like the pride of responding to “Where did you get that?” with “I made it myself!”
Remember that garden art doesn’t need to be perfect to be beautiful. Some of my most cherished pieces bear the marks of learning and experimentation. Start with these beginner-friendly projects, then let your creativity guide you toward more ambitious sculptures as your confidence grows.
Your garden deserves your personal artistic touch—these five projects are just the beginning of what’s possible when you embrace the joy of creating DIY garden sculptures.