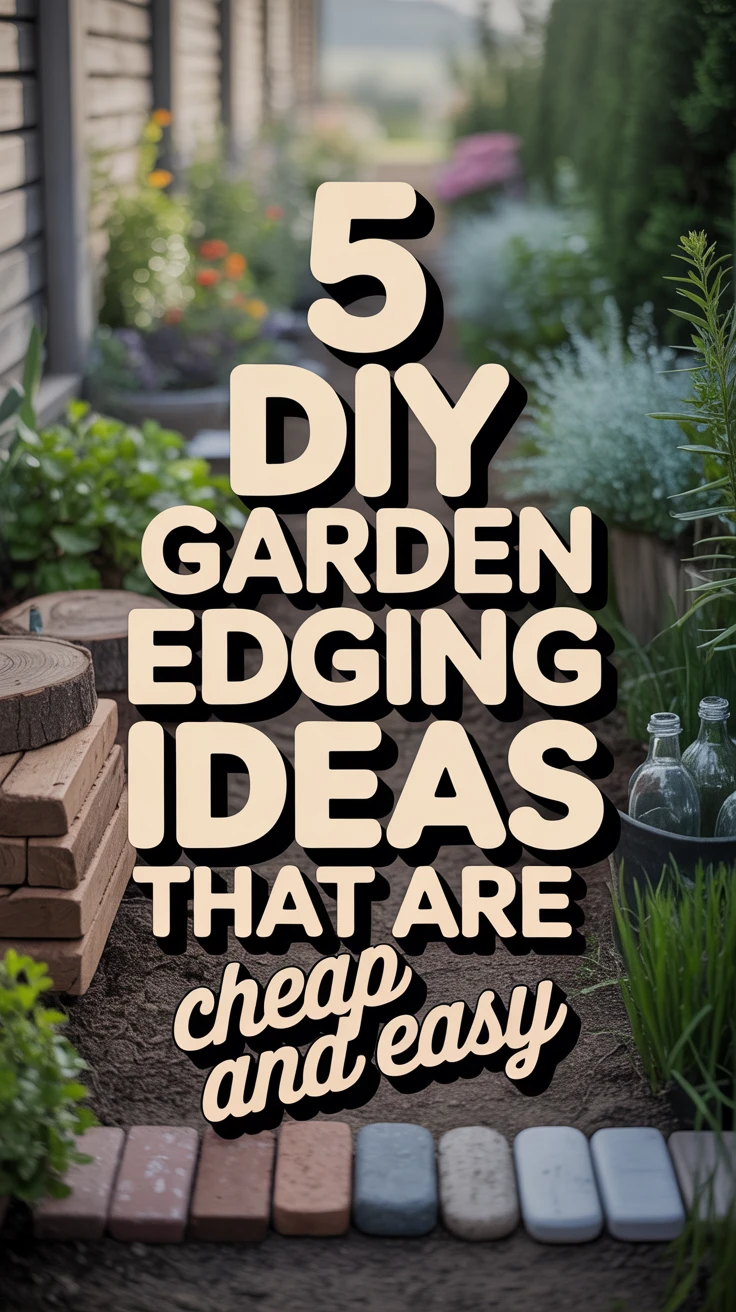
Introduction
Garden edging is one of those landscaping elements that can transform an ordinary garden into something truly special. Not only does it create clean lines and define spaces, but it also helps prevent grass from invading flower beds and keeps mulch where it belongs. As a long-time gardener who’s experimented with countless edging techniques, I’ve discovered that you don’t need to spend a fortune to achieve professional-looking results. In fact, some of my most successful garden borders have been created using materials that cost next to nothing!
In this article, I’ll share five of my favorite DIY garden edging ideas that are both budget-friendly and simple to implement. Whether you’re a novice gardener or a seasoned green thumb looking to save some money, these projects will help you add structure and style to your outdoor space without breaking the bank.
1. Brick Edging: Classic Appeal on a Budget
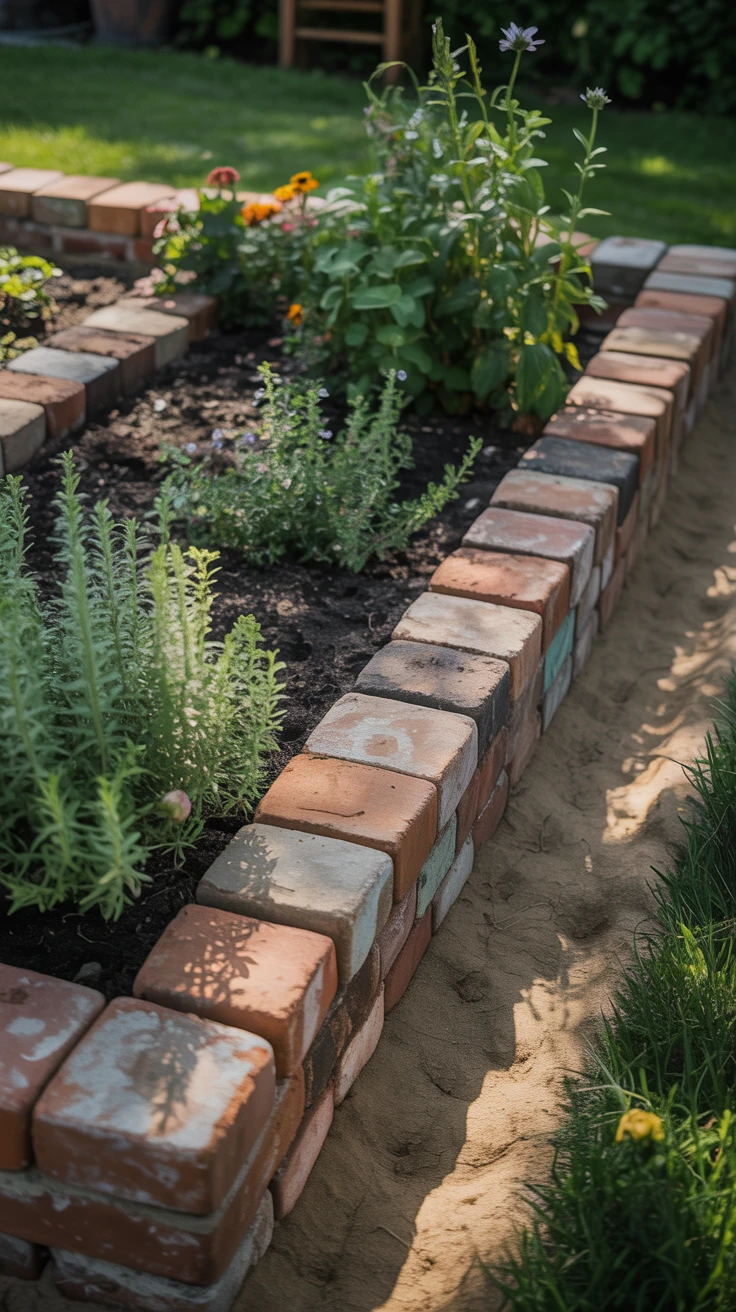
Brick edging offers timeless charm and remarkable durability. I remember the first time I installed brick edging around my herb garden—I was amazed at how such a simple addition completely transformed the space. The best part? You don’t need to buy new bricks to achieve this look.
Reclaimed bricks are often available for free or at minimal cost from construction sites, demolition projects, or online marketplaces. I once scored two dozen vintage bricks from a neighbor’s renovation project simply by asking if I could take them off their hands!
Installation Options:
- Trench method: Dig a narrow trench about 4-5 inches deep, place bricks vertically side by side, and backfill with soil.
- Flat-laying method: Place bricks horizontally along the border, either in a straight line or curved pattern.
- Sailor style: Stand bricks upright with their narrow edges facing outward for a taller border.
- Basket weave pattern: Alternate the direction of flat-laid bricks for a decorative effect.
Pro Tip: For areas with heavy rainfall, add a layer of sand beneath your bricks to improve drainage and prevent shifting. I learned this the hard way after a spring downpour dislodged my first brick border installation!
2. Wooden Log Edging: Natural Rustic Charm
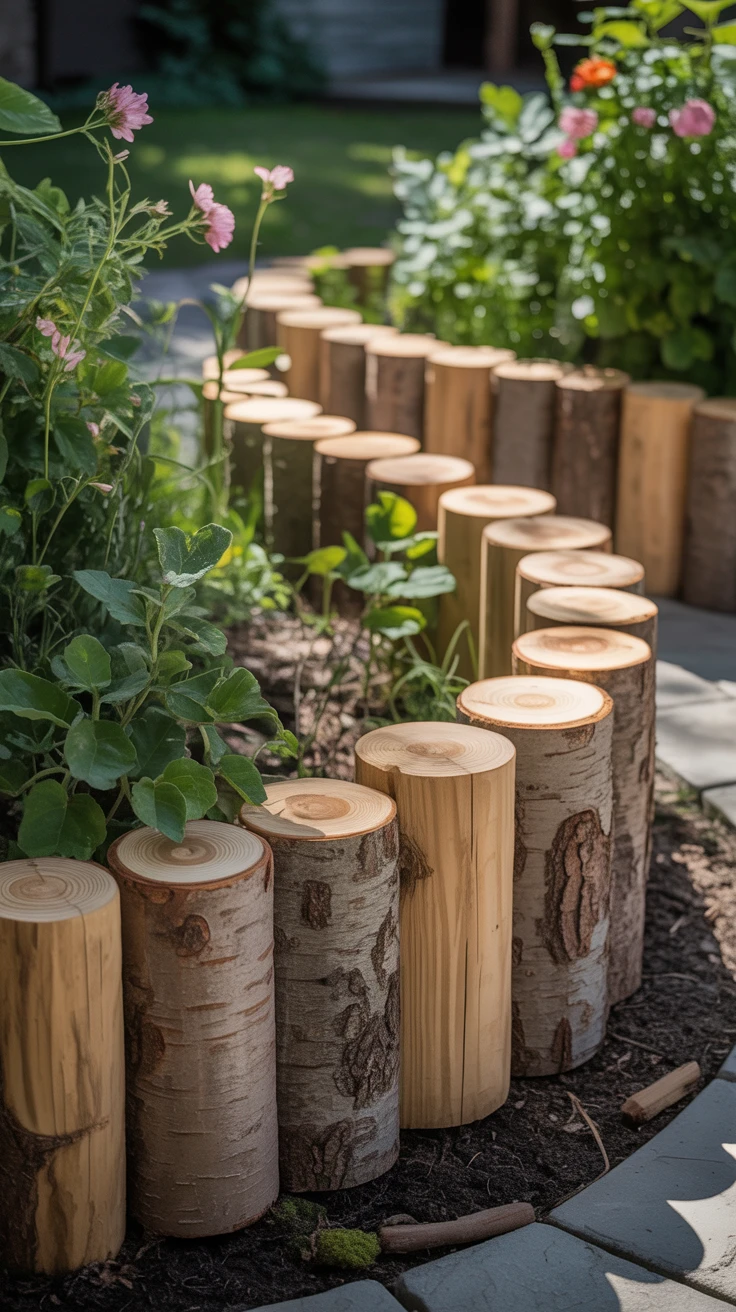
There’s something inherently appealing about using natural wood elements in the garden. After a storm brought down several branches in my yard last year, I decided to repurpose them as garden edging rather than hauling them to the dump—a perfect example of how cheap DIY garden edging can come from unexpected sources.
Logs and branches create a rustic, organic border that blends beautifully with natural landscapes. Plus, they’re often completely free if you have trees on your property or know someone who does.
How to Create Log Edging:
- Collect fallen branches or logs of similar diameter (3-6 inches works well).
- Cut them to equal lengths (8-12 inches for vertical placement, longer for horizontal).
- Remove any bark if you want to prevent insects (though I often leave it on for a more natural look).
- For vertical placement, dig a trench about 1/3 the height of your logs.
- Place logs side by side in the trench and firmly pack soil around them.
Pro Tip: Consider treating your wood with a natural preservative like linseed oil to extend its lifespan. Without treatment, expect to replace wooden edging every 2-3 years as it naturally decomposes—though I’ve found this decomposition actually benefits nearby plants!
3. Stone and Pebble Edging: Timeless Elegance
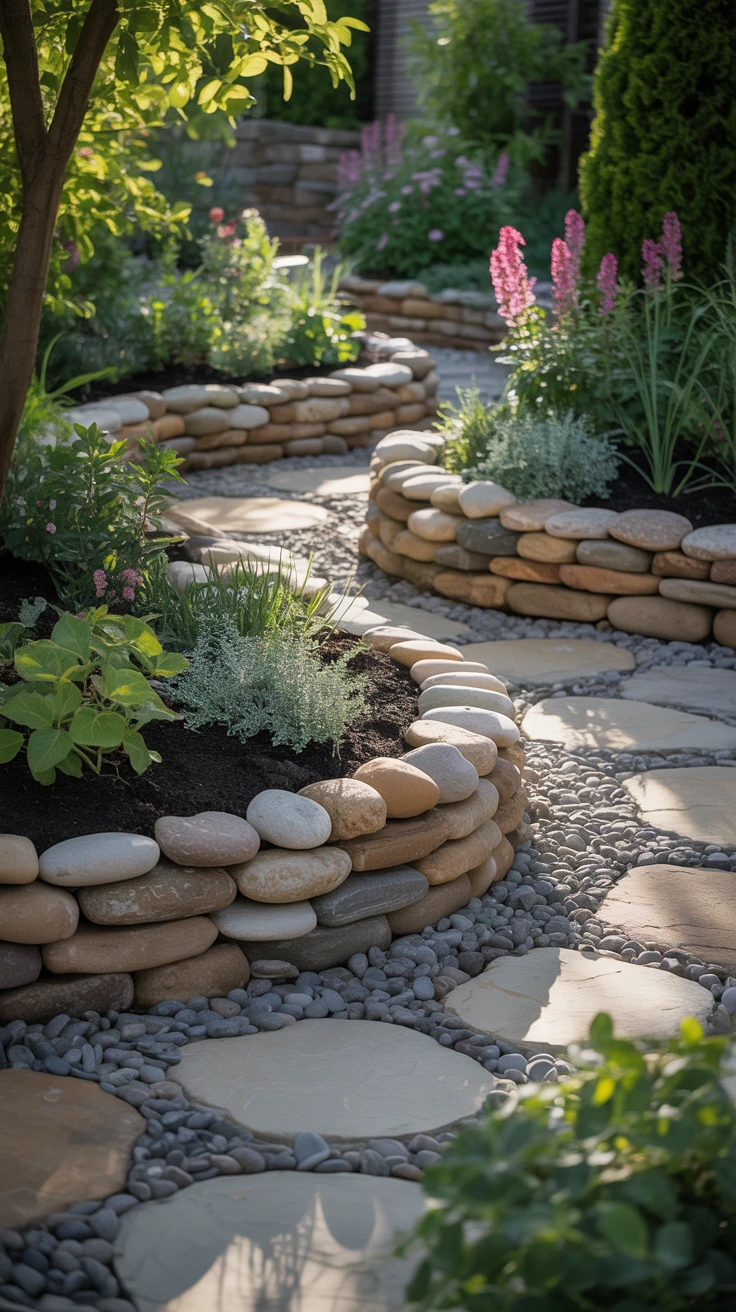
Stone edging offers perhaps the best combination of durability and natural beauty. When I moved into my current home, the previous owners had left a pile of unused landscaping stones behind the shed. This “eyesore” became the foundation for my most complimented garden feature—a winding stone border around my perennial bed.
The beauty of stone edging is its versatility. From formal, perfectly aligned borders to casual, meandering edges, stones can adapt to any garden style.
Material Selection Tips:
- Fieldstones: Natural, irregular stones collected from fields or wooded areas (always ask permission on private property).
- River rocks: Smooth, rounded stones that create a more polished look.
- Flagstones: Flat stones that can be partially buried for a flush edge.
- Pebbles and gravel: Create a defined border by digging a small trench and filling it with small stones.
For the most budget-friendly approach, I recommend visiting construction sites (with permission) where stones are often discarded, checking free listings online, or exploring your own property for natural stones.
Pro Tip: Before placing larger stones, lay them out in your desired pattern and take a photo. This makes it easier to recreate your design when you’re ready for permanent installation and helps identify any awkward gaps or transitions.
4. Recycled Material Edging: Creative Sustainability
Some of my most unique garden borders have come from materials most people would consider trash. Using recycled items for DIY garden edging not only saves money but also reduces waste—a win-win in my book!
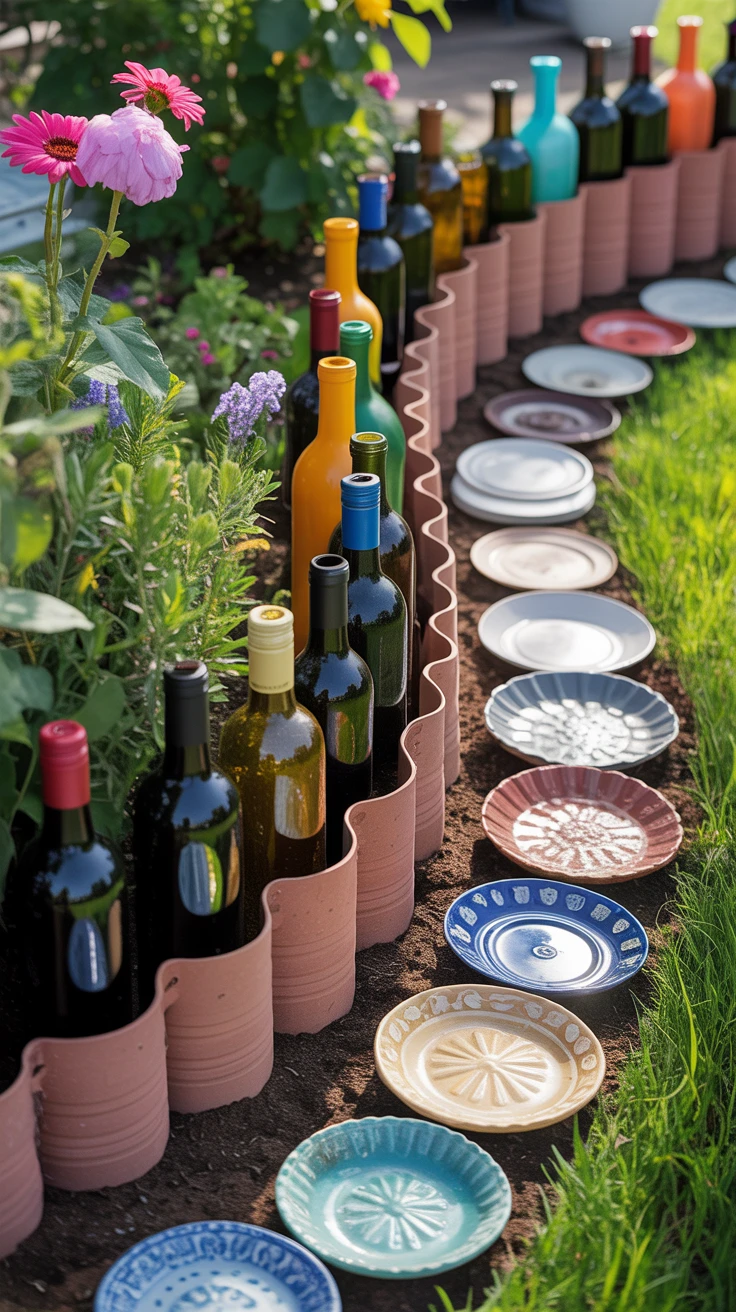
I once created a whimsical border using wine bottles collected from a year of family gatherings. Buried neck-down in the soil, they created a colorful edge that caught the sunlight beautifully. Visitors always ask about this conversation-starting feature, and I love sharing that it cost absolutely nothing.
Creative Recycled Edging Ideas:
- Glass bottles: Buried upside down for a colorful border.
- Broken ceramic plates or tiles: Arranged in a mosaic pattern along garden edges.
- Old metal roof tiles: Partially buried to create a scalloped edge.
- Repurposed plastic edging: Cut from old plastic containers or buckets.
- Tin cans: Painted and placed side by side for an industrial look.
Pro Tip: When using glass bottles or metal materials, ensure all edges are safe and not exposed where they might cause injury. I smooth any sharp edges with sandpaper or bury them completely below soil level for safety.
5. Metal and Wire Edging: Modern Minimalism
For gardens with a more contemporary aesthetic, metal edging provides clean lines and lasting durability. While commercial metal edging can be expensive, there are several cheap DIY garden edging alternatives using metal materials.
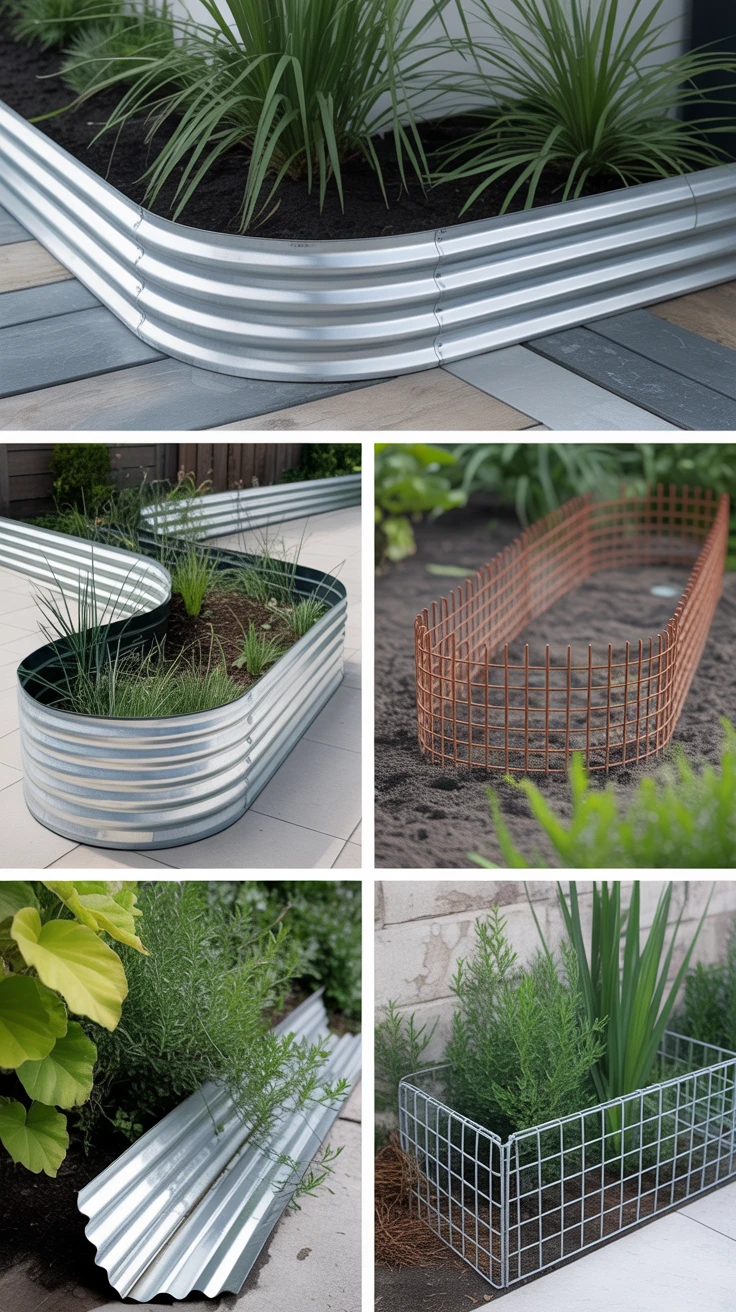
After replacing our roof, I salvaged some leftover corrugated metal sheets and transformed them into sleek garden borders by cutting them into 6-inch strips. The galvanized finish developed a beautiful patina over time, blending perfectly with my modern landscape design.
Affordable Metal Edging Options:
- Corrugated metal roofing: Cut into strips and partially buried.
- Hardware cloth or chicken wire: Formed into low decorative fences.
- Metal flashing: Flexible and perfect for curved borders.
- Rebar or metal rods: Inserted into the ground in decorative patterns.
- Salvaged metal pieces: Old tools, farm equipment, or metal scraps arranged artistically.
Pro Tip: When cutting metal for garden edging, always wear protective gloves and eyewear. I also recommend filing down any sharp edges and applying a coat of clear outdoor sealant to prevent rust if using non-galvanized metal.
Conclusion
Creating beautiful garden borders doesn’t require expensive materials or professional installation. With a bit of creativity and elbow grease, you can design stunning edges that define your garden spaces while keeping your budget intact.
I’ve implemented all five of these DIY garden edging ideas in different areas of my landscape over the years, and each has its own unique charm and advantages. The beauty of these budget-friendly approaches is that you can easily change them if your garden style evolves or if you simply want to try something new.
Remember, the best garden edging not only complements your plants and overall design but also reflects your personal style. Don’t be afraid to mix and match these ideas or put your own creative spin on them. Happy gardening!
Frequently Asked Questions
How long do DIY garden edgings typically last?
The lifespan varies by material. Stone and brick edging can last decades with minimal maintenance. Metal edging typically lasts 5-10 years depending on the type of metal and climate. Wood and recycled materials generally need replacement every 2-5 years, with untreated wood decomposing faster in wet climates.
What’s the easiest DIY garden edging for beginners?
Stone or pebble edging is typically the most beginner-friendly option. It requires minimal tools, no cutting or special techniques, and can be rearranged easily if you’re not satisfied with your first attempt. Simply laying stones along your garden border creates an immediate visual impact with very little effort.
Do I need to install weed barrier fabric beneath my garden edging?
While not absolutely necessary, installing weed barrier fabric beneath stone, pebble, or brick edging can significantly reduce maintenance by preventing weeds from growing between the materials. For wooden, metal, or bottle edging that’s inserted into the ground, weed barrier isn’t typically needed.
Can these DIY garden edging ideas work in all climate types?
Yes, though you may need to adapt materials based on your climate. In freeze-thaw climates, ensure brick or stone edging has proper drainage to prevent heaving. In very wet climates, consider treating wooden edging to prevent rapid decomposition. In hot, dry climates, metal edging may become extremely hot, so position it away from areas where people or pets might touch it.
How deep should I bury my garden edging materials?
As a general rule, bury about 1/3 of your edging material below ground level. For taller edging like bottles or vertical logs, 4-6 inches is usually sufficient. For stones or bricks laid flat, 1-2 inches is typically adequate. Proper depth helps prevent materials from shifting and creates a clean, stable border.